
The tiles stay up, and so does your mood: a straightforward professional trick ensures your wall tiles finally remain exactly where they belong.
Many DIY enthusiasts will recognise the situation: newly chosen wall tiles are fixed to the wall, only to slowly but surely slide down again. Frustration, sweat and crooked grout lines are almost inevitable. Yet with proper preparation, the right adhesive and a smart technique involving a simple wooden batten, this problem is surprisingly easy to avoid.
Why wall tiles tend to slide while being fitted
Adhesive that is too runny and layers that are too thick
The most common cause is found in the bucket: incorrectly mixed tile adhesive. Many people deliberately mix the adhesive too soft because it seems easier to spread. That is precisely what causes tiles to “swim” on the wall and gradually sink down.
The adhesive should have the consistency of a firm, mouldable paste that stays on the trowel rather than running off.
Another familiar mistake is applying an excessively thick layer. The thinking is: “More is better, so it will hold more securely.” In reality, the opposite happens. A layer that is far too thick acts like a lubricating film. Under the tile’s weight and the pull of gravity, the entire row starts to move.
To stop tiles from slipping, follow the manufacturer’s mixing instructions closely. Measure carefully, check the guidance again if necessary, and spend a few extra minutes mixing rather than casually adding more water.
Choosing the right tile adhesive: why the C2 classification matters
In addition to consistency, the adhesive type is crucial. For wall tiles, it is worth using a cement-based adhesive with a C2 classification. This designation indicates increased tensile adhesion strength – in other words, the adhesive grips more firmly, particularly on vertical surfaces.
Checking the label pays off twice. In particular, look for:
- C2 classification: improved adhesion, ideal for wall surfaces
- An “open time” of at least 20 minutes: sufficient time for adjustments
- Suitability for the relevant material: ceramic, porcelain stoneware or natural stone
Levelling systems with self-clamping clips or conventional tile spacers are also useful additions. They keep joint widths even and prevent individual tiles from “getting away” while neighbouring ones are already beginning to set.
The simple wooden batten trick for mechanical support
Why you should not start directly on the floor or worktop
Many people instinctively begin at the bottom, directly on the floor, shower tray or kitchen worktop. It sounds sensible, but it often produces uneven walls. Floors and worktops are rarely perfectly level. Even a small difference in height transfers from one row to the next, leaving the whole wall looking crooked, even when every individual tile was laid neatly.
How to align a supporting wooden batten perfectly
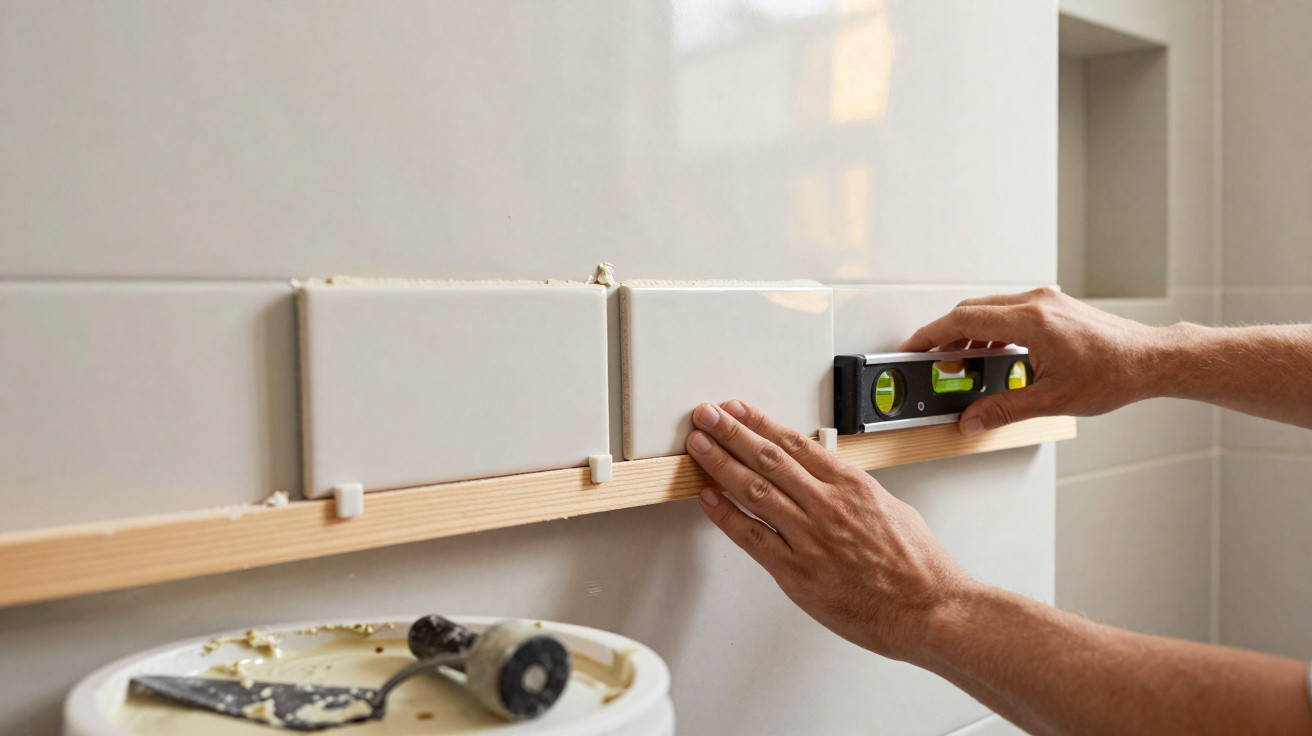
The professional method uses a temporarily screwed-on wooden batten, sometimes called a tiling batten. It provides a support ledge for the first visible row of tiles and therefore indirectly carries the entire tiled area above it.
Proceed as follows:
- Use a spirit level to mark a perfectly horizontal line on the wall at the height where the second row of tiles is to begin.
- Position a straight wooden batten, such as a simple piece of roofing batten, along this line.
- Secure the batten firmly to the wall using suitable screws.
- Check once more with the spirit level: the batten must be completely level, otherwise every row above it will also be uneven.
This simple wooden batten works like a small scaffold: it bears the weight of the tiles and prevents any tendency to slide down.
From this point, the first laid row rests neatly on the wooden batten. This removes pressure from the adhesive, creates straight grout lines and makes the job considerably more relaxed.
Achieving a “valve effect” on the wall with double adhesive application
Why double application is essential for larger tile formats
The larger the tile format, the more critical adhesion becomes. For these formats, professionals use a double adhesive application, often called “buttering-floating”. Adhesive is applied both to the wall and to the back of the tile.
This is how it works:
- Spread adhesive over the wall using a notched trowel, with notches of around 6 mm, and create even ridges.
- Apply a thin layer of adhesive to the reverse of the tile as well.
- Make the ridges on the wall and tile cross wherever possible – for instance, horizontally on the wall and vertically on the tile.
- Press the tile firmly into position and move it gently back and forth until it sits securely.
Crossing the adhesive ridges allows trapped air to escape more easily – the tile virtually “sucks” itself into place and remains stable.
This technique achieves full-surface adhesion, minimises voids and significantly reduces the risk of cracks or loose areas after several years.
How to achieve a professional tiler’s finish
Patience is the secret weapon: wait 24 hours before fitting the bottom row
Once the upper section of the wall has been tiled, most people are eager to remove the wooden batten and quickly complete the bottom row. This is exactly where many decide whether the result will be successful or troublesome.
Tile adhesive needs time to cure completely. The guideline values in EN 12004 and the instructions printed on the bag are not decorative details; they are essential for long-term durability. As a rule of thumb, allow at least 24 hours of drying time before removing the wooden batten.
Only once the adhesive has had this time to cure can the wall genuinely support the tiles independently. The batten can then be unscrewed safely, and the bottom row can be fitted carefully, including every cut required around the floor, shower tray or kitchen worktop.
Your plan for slip-free wall tiles
The most effective way to prevent sliding tiles consists of four simple steps applied consistently:
- Choose high-quality adhesive with a C2 classification that provides both strong adhesion and adequate open time.
- Fit a straight, temporary wooden batten to support the first visible row and maintain clean lines.
- Use double adhesive application with a notched trowel to press tiles against the wall with virtually no trapped air.
- Stay patient and allow the adhesive to cure before beginning the bottom row and finishing work.
Additional practical advice for a durable tiling project
Check the substrate before the first dab of adhesive reaches the wall
Even the best adhesive is of little use if the substrate is unsuitable. Before you begin, carry out a quick check:
- Thoroughly remove dust and loose paint residues
- Pre-treat highly absorbent substrates with primer
- Tap existing tiles to identify hollow areas, then remove loose pieces
- Level uneven sections and holes with filler
A stable, clean substrate reduces later damage and ensures the adhesive can deliver its full holding power.
Common mistakes DIY enthusiasts can easily avoid
The same problems appear repeatedly, but they can be prevented easily when you know about them in advance:
- Spreading adhesive across areas that are too large at once – it starts setting before the tiles are in place.
- Working without tile spacers or a levelling system – joints become uneven.
- Skipping the spirit level – visual checks alone are rarely sufficient.
- Pressing tiles right into corners – movement joints (silicone) are forgotten and stresses increase.
Taking a moment to account for these points saves a great deal of correction work later and helps you keep your composure.
Why the extra effort is genuinely worthwhile
A neatly tiled wall area will last for many years, often decades. Every additional planning and working step is worthwhile, especially in bathrooms and kitchens. Combining stable adhesive, mechanical support from the wooden batten and careful adhesive application not only prevents tiles from sliding but also noticeably improves the appearance: even joints, straight lines and a calm overall finish.
Once you have mastered this method, you will usually feel confident enough to tackle further projects: a tiled shower niche, a splashback behind the washbasin or a decorative tiled wall in the entrance hall. Using the same approach – wooden batten, C2 adhesive, double application and patience – all of these surfaces can be completed safely and without stress.

Comments
No comments yet. Be the first to comment!
Leave a Comment