
Many DIYers drill a hole, push in a wall plug and tighten the screw – only to wonder why the new coat rack, jackets included, ends up back on the floor. The difference between a loose fitting and a rock-solid wall fixing depends less on expensive professional tools than on a few deliberate techniques that even experienced home improvers often overlook.
Why so many wall plugs fail
The usual mistake happens well before the first drilling dust appears: anyone who does not know what their wall is made from is working blind. That is when wall plugs spin in place, pull out or hold only until the coat rack is loaded with heavy winter coats.
The durability of a wall plug depends 80 per cent on three things: the right plug, a precise hole and a clean substrate.
The good news is that mastering these three points allows you to fix a surprising amount of weight securely, even to challenging walls – from an XXL mirror to a television on a thin partition wall.
The right wall plug for the right wall
Before the drill bit is even fitted, there is one straightforward task: identify the wall type. It takes only seconds, yet determines whether the job succeeds or fails.
How to identify the type of wall you are dealing with
- Concrete or solid masonry: a hard, dull sound when tapped, and the drill advances only slowly.
- Brick or hollow block: resistance changes while drilling, the drilling dust is comparatively coarse, and parts of the hole may crumble away.
- Plasterboard / lightweight partition wall: a bright sound, the drill moves through easily, and the drilling dust is very fine and pale.
If you are still unsure, drill a small test hole in an inconspicuous spot. This can prevent larger break-outs later, or several misplaced holes in a prominent part of the living room.
Which wall plugs are suitable for which jobs
Shops offer what seems like an endless range of wall plugs, but in practice there are only a few types you really need to understand:
- Standard and universal wall plugs: work well in concrete and solid masonry. They expand in the firm material and grip it tightly.
- Toggle and cavity wall plugs: designed for plasterboard and thin lightweight walls. They open across a wide area behind the board, spreading the load.
- Special wall plugs for hollow bricks: often have fins or longer expansion sections, allowing them to grip the webs rather than simply disappearing into the void.
The cardinal error is forcing a short plastic wall plug into a thin lightweight wall. The screw may hold initially – until a little weight is added. The plug can then simply tear through the plasterboard.
Common pitfalls when choosing wall plugs
DIYers repeatedly fall for two misconceptions:
- Wall plug too short: It grips only near the surface, so the force is not distributed within the wall. This causes material to break away around the hole.
- Wall plug too long: Particularly in thin walls, it can break through the rear side or simply slide into empty space.
Taking a moment to inspect the wall and read the packaging instructions saves filler and frustration later. The perhaps uncomfortable truth is that the drill was not “bad”; the problem was the combination of wall, wall plug and load.
The drilled hole: millimetre precision, not rough guesswork
Once you have selected the wall plug, the hole determines success or failure. Being just a few millimetres over or under can dramatically reduce its holding strength.
Diameter and depth – the simple basic rule
Every pack of wall plugs gives two crucial details: the recommended drill diameter and the maximum screw size. These figures are not decorative text; they are effectively a safety belt.
- Hole too large: The wall plug wobbles, turns with the screw and cannot expand properly.
- Hole too small: The wall plug deforms or splits when tapped in, severely reducing its holding strength.
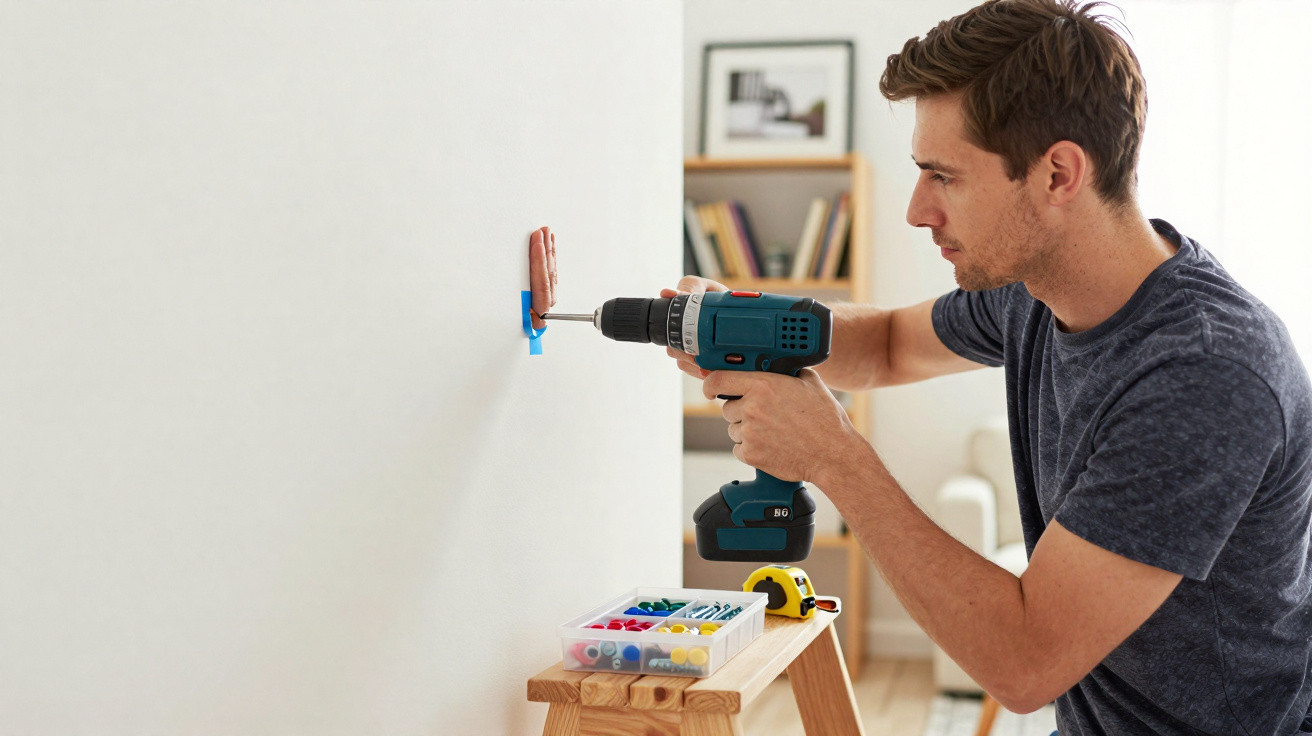
The hole should be slightly deeper than the wall plug is long. This gives it room to expand without putting pressure on the wall surface at the front. One useful trick is to mark the required depth on the drill bit with masking tape, so you do not accidentally drill too far.
What matters when using a drill
A blunt drill bit in an unstable drill will not produce an accurate hole. Drilling into concrete requires a hammer setting and a sharp masonry drill bit. With plasterboard, however, the hammer setting is off limits; a clean rotary drill bit is entirely sufficient.
Key points for a good drilled hole:
- Always hold the drill at a right angle to the wall.
- Use moderate pressure: let the machine drill, rather than relying on muscle power.
- Discard old, worn drill bits, especially when working with hard materials.
Anyone who has used a fresh drill bit on concrete will notice immediately: the same DIYer suddenly seems like a professional.
The inconspicuous yet crucial detail: cleanliness
Drilling dust acts like a fine separating layer between the wall plug and the wall. It lets the plug slip more easily and reduces friction. This is where the “secret” professional technique comes in:
Thoroughly remove dust from the drilled hole before inserting the wall plug – using a vacuum cleaner, blower or, if necessary, a drinking straw.
This simple step noticeably increases holding strength, particularly in porous or sandy substrates. Many professional fitters swear by it and would never put a wall plug into a dusty hole.
The overlooked techniques used by professionals
Anyone who regularly fits shelves, televisions or wall cabinets develops small routines that are scarcely known at home – and which make all the difference in tricky situations.
Reinforcing difficult walls intelligently
Old, cracked plaster walls and badly broken-out areas are especially troublesome. Targeted measures can help here:
- Timber reinforcement: A timber batten can be fitted behind a plasterboard panel, providing something secure to screw into later. The kitchen cupboard is then no longer supported solely by the thin board.
- Longer wall plugs: In hollow concrete blocks, a longer plug may reach a web farther back and hold securely there.
- Metal cavity wall plugs: These expand over a broad area behind the board, distributing weight more effectively than simple plastic plugs.
If the substrate starts crumbling as you drill, do not simply make a second hole next to it. A small reinforcement solution is more sensible; otherwise, the same issue will merely recur.
The masking-tape trick and other useful aids
Applying a piece of painter’s tape or clear adhesive tape over the drilling point prevents edges from breaking away – especially on tiles or freshly painted walls. The hole is cleaner and the appearance remains intact.
For very porous walls, some professionals use a tiny drop of construction adhesive or injection mortar in the hole. Once it has cured, the wall plug is almost impossible to move. This method is suitable for heavily loaded fixings, such as wall cabinets on crumbly masonry. Just bear in mind that making adjustments later will be very difficult.
How much weight can each wall plug hold?
Anyone fitting heavy items such as televisions, kitchen cupboards or large mirrors should plan rather than guess. As a broad guide, check the manufacturer’s instructions, which often state specific load ratings in kilograms.
A few rules of thumb that have proven useful in practice:
- Light loads (pictures, small shelves) – a normal wall plug is usually enough in solid masonry.
- Medium loads (larger shelves, coat racks) – choose a high-quality branded wall plug; in cavities, use dedicated cavity wall plugs.
- Heavy loads (wall cabinets, filled shelves) – use several fixing points and, where possible, drill into load-bearing walls.
Planning carefully means spreading the weight across several wall plugs instead of hanging everything from one point. This greatly improves safety, especially in homes with older construction.
Additional advice for safe DIY work
Before drilling any hole, be clear about this: services run behind many walls. A cable and pipe detector helps you avoid electrical cables and water pipes. Particularly in kitchens and bathrooms, one wrongly placed hole is enough to risk costly water damage or an electric shock.
The terms used for wall plug technology can also seem complicated at first. “Expanding” simply means that the wall plug widens inside the hole and grips firmly. A “cavity” means there is empty space behind the visible board, where the wall plug must open or lock itself in place to hold.
Anyone who spends one or two evenings testing their own walls, buying suitable wall plugs and practising the steps described here will quickly find that wall fixing, initially an irritating subject, becomes a routine that is almost enjoyable – especially when the shelf remains stable months later despite having been overloaded for some time.



Comments
No comments yet. Be the first to comment!
Leave a Comment