
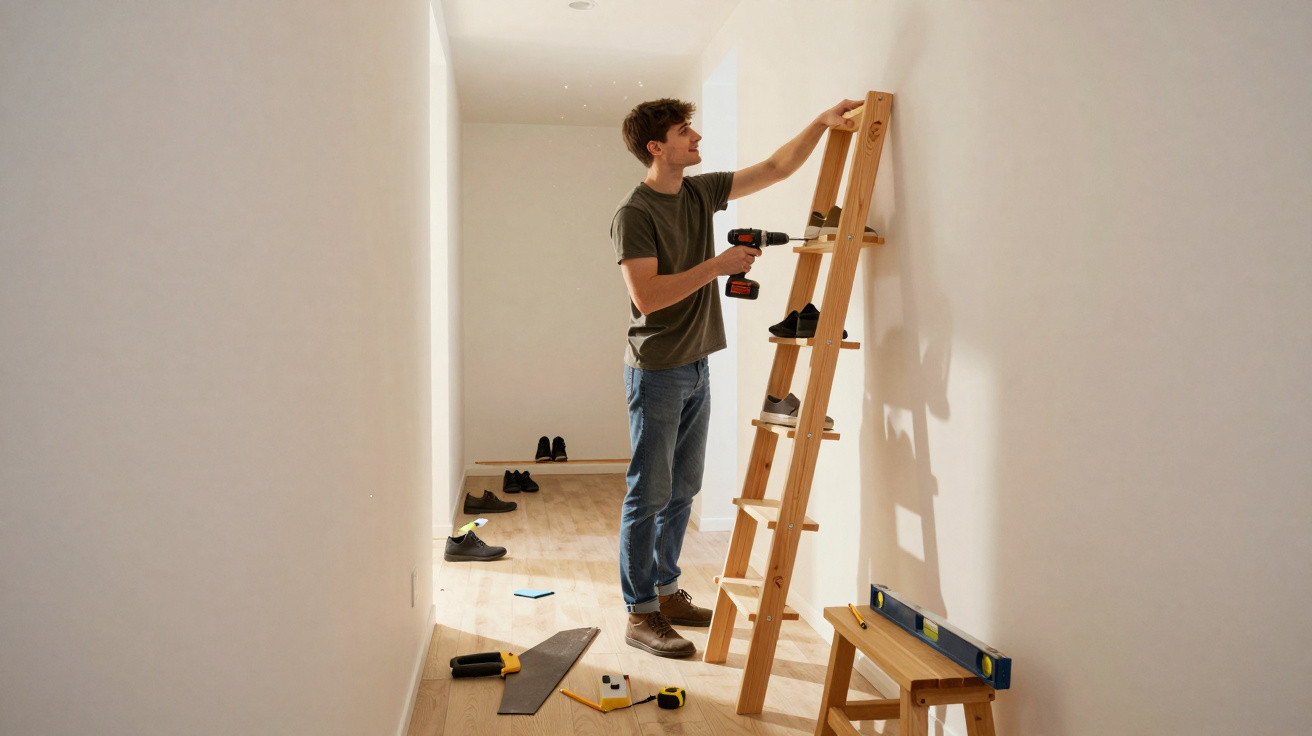
Many flats share the same issue: a tiny entrance, barely any room to place furniture, and a pile of shoes that grows every day. To keep this area tidy and safe, you need a piece of furniture that fits your floor plan precisely rather than taking up half the hallway. The good news is that a sturdy, almost free shoe rack can be made from a few offcuts of timber and basic tools. It clears shoes off the floor and helps prevent trips and falls.
Why a well-designed shoe rack transforms the hallway
Even a narrow corridor measuring four metres long and one metre wide can become seriously obstructed by just a few pairs of shoes. In particular, entrances in urban flats of 20 to 30 square metres quickly turn into trip hazards, especially when you need to pass through carrying shopping bags or pushing a pram.
“A slim, thoughtfully designed shoe unit lifts footwear off the floor, creates a calmer appearance and significantly reduces the risk of falling.”
For tight hallways, interior designers recommend furniture only 15 to 20 centimetres deep. This is sufficient for trainers, low shoes and even many ankle boots, without noticeably restricting the walkway. Building the rack yourself lets you use every millimetre of the available space instead of settling for standard dimensions from a furniture shop.
Offcuts from previous projects are especially useful. Roof battens, boards from unwanted shelving or timber from pallets can all be reused. This saves money, cuts waste and can result in a unit that feels considerably sturdier than some inexpensive ready-made chipboard cabinets.
Ladder-style shoe rack: sturdy, affordable and quick to make
One particularly durable option is based on a ladder-style construction. It uses two upright side rails with angled shelves positioned between them, allowing shoes to sit with a slight forward tilt. This keeps everything visible while requiring very little depth.
Materials and tools at a glance
- Timber offcuts, such as boards around 15 cm wide or structural timber measuring 40 x 60 mm
- Wood screws and, if required, wood glue
- A saw, either a mitre saw or handsaw
- A cordless drill-driver with a drilling function
- Tape measure, pencil, try square and spirit level
- Sandpaper or a sanding block
If you have wide boards left over, use them to make the side panels and shelves. With structural timber, the sides can be built like small ladders and then covered with battens.
Step-by-step construction
For a conventional freestanding shoe rack with three levels and a height of roughly 90 to 100 centimetres, follow these steps:
- Cut two side panels to size, for example 90 cm long and 15 cm wide.
- Trim three shelves to the required width, for example 60 to 80 cm.
- If the shelves are to be installed with a slight slope, optionally mitre-cut their front edges.
- Mark the lowest shelf about 5 to 10 cm above the floor, position the middle shelf halfway up, and place the top shelf just below the upper edge.
- Pre-drill and screw the shelves to one side panel first, then fit and screw on the second side panel.
When using structural timber, first make one “ladder” for each side. Set the rungs at an angle of around 20 degrees towards the front. Cut angled ends so that they sit flush against the uprights. Then attach two to three narrow battens to every rung, creating an open, airy shelf.
“A slight tilt of around 20 degrees is enough to keep shoes secure while sacrificing very little depth.”
Making the rack genuinely stable
A quick check will help ensure the unit does not wobble:
- Measure diagonally: if the measurements from corner to corner match, the rack is square.
- A cross brace or a back panel made from a thin board noticeably improves rigidity.
- In homes with children, secure the rack to the wall using brackets.
If you clean the hallway often, raise the feet by a few centimetres so a mop or vacuum cleaner can pass underneath easily.
Wall-mounted shoe rack with adjustable shelves for extremely limited space
A wall-mounted rack is even more space-efficient because it has no feet and features height-adjustable shelves. The floor remains completely clear, leaving room beneath the shoes for a child’s bicycle or vacuum cleaner.
Making wooden support rails
Rather than buying costly metal rails, you can cut simple support pieces from narrow wooden strips. Typical dimensions are around 1.3 cm thick, 5 cm high and 25 cm long. Screw two of these strips horizontally next to each other on the wall, on both the left and right sides, leaving a small gap between them. These “pairs” support square shelves.
Suitable shelves can be made from boards measuring approximately 25 x 25 cm and about 2.5 cm thick. Simply slide the boards onto the supports. If more clearance is needed, move a board up by one level. This gives each type of footwear its own area:
- lower level: trainers, children’s shoes or slippers
- middle level: low shoes and lighter ankle boots
- top level: tall boots or pairs worn less often
Aligning the system securely on the wall
Begin by marking a straight, level baseline with a spirit level. Screw the first support strips along this line. Then work upwards one row at a time, placing each row, for example, 20 to 25 centimetres higher.
Especially in an entrance area or communal hallway, consider the remaining furnishings as well. Will the highest row still fit below the coat rack? Can you still reach the flat door or electrical consumer unit? You can test the spacing beforehand using a simple strip of cardboard as a template.
In a cellar or garage, do not place the bottom row directly on the floor. Raising it by 10 to 15 centimetres protects shoes from moisture and makes the floor easier to clean.
Preparing timber properly: no splinters and no damage to shoes
Used timber often has dents and rough edges. A brief sanding session is enough to turn it into a practical everyday piece of furniture. Lightly round off the front edges and corners in particular to prevent damage to delicate shoe toes.
“Rounded front edges prevent pressure marks on leather and make the rack safer for children.”
Very dry timber can develop small cracks or chipped areas. These can be filled with wood glue or wood filler. For a more polished appearance, apply clear varnish, wax or wood stain. Light shades make a hallway appear larger, while dark colours create contrast against pale walls.
Safety, load capacity and sensible planning
Shoes may seem lightweight, but several shelves filled with winter boots soon add up. It is therefore worth considering three points:
- Screw length: Choose screws that are slightly longer so they grip deeply into the timber.
- Wall type: Standard wall plugs work in concrete or brick, while plasterboard requires specialist cavity fixings.
- Loading: Put heavier footwear on the lower shelves and reserve the upper levels for lighter pairs.
A rough sketch on paper is useful before making the final screw fixings. Taking account of the number of household members, the seasons and the footwear typically worn will prevent later rearranging. For example, a family of four can quickly accumulate 20 to 25 pairs for everyday use alone when summer and winter shoes are included.
Further ideas and useful additions
The principle of “reclaimed timber instead of throwing it away” can easily be extended. Fit a narrow board with hooks between the shoe rows for keys or a dog lead. A small box fixed on top can hold shoe polish, waterproofing spray and brushes. If you have high ceilings, use the upper area for rarely worn shoes stored in boxes or baskets.
A mini rack based on the same idea can also be made for a child’s bedroom, simply lower in height and painted in brighter colours. Children can reach their own shoes, learn to keep things tidy and are less likely to trip over pairs left on the floor. For very young children, it is also advisable to place a non-slip mat in front of the rack so that nothing slides while shoes are being put on or taken off.
An organised shoe system also offers benefits for allergy sufferers and households with pets. Less dirt from outside is spread through the home, and dogs or cats are less likely to reach damp laces or soles coated with road salt. Combined with a washable doormat and a dedicated place for outdoor footwear, it makes the entrance area more hygienic without the need to buy new furniture.


Comments
На современном земном шаре трудность наркотической зависимости является одной с наиболее острых. Несмотря на пропаганду с верхушки здорового образа жизни, тысячи жителей что ни год становятся жертвами разных наркотиков. Особенно небезопасны так называемые известные наркотики — кокаин, меф, гашиш, купить шишки купить кокаин марихуана и еще «купить бошки».
Употребление их часто принимается как что-то безвредное или хоть пристижное, купить марихуану хотя соглашусь мнимым кайфом хоронятся опасные вредные последствия. Кокаин — мощный электростимулятор стержневой нервной системы.
Он вызывает на время чувство радости, убежденности, а также драйва. Но согласно данным цена очень велика: зависимость развивается стремительно, а постоянное применение ведёт к истощению вен, сбиванию душевного ровновесия, психозам и даже длительным депрессиям.
Кокаин сносит приставки не- только тело, но и еще сущность. Меф, синтетический стимулятор, известен своими здоровыми галлюциногенными и возбуждающими признаками. Мефедорн мгновенно побуждает толерантность к тому же приводит к тяжеловесным следствиям: бессоницу, бруксизм, расстройства психики, состояние крайней усталости организма а также даже смертельный исход.
Постоянное употребление может закончиться шизофренией а также полной общественной изоляции. Избавиться от наркомании — тяжело, но можно. Ядро — уяснение вопроса и еще желание измениться полностью. Помощь мастериц, опека родственников а также своя целеустремленность могут вернуть лица к обычной, каждодневной сути.
Адекватность ценообразования, доступность цен, экспресс сроки http://analyztepla.ru/katalog-elektro-radio-izmeritelnykh-priborov/vattmetryi-izmeriteli-moshhnosti/
Поверка, как обязательная, так и добровольная, проводится в соответствии с методикой в полном ее объеме, поэтому техническое содержание метрологической процедуры заранее известно, а значит оценить объемы работ и соответственно их стоимость проблемы не составляет https://analyztepla.ru/katalog-izmeritelnykh-priborov/vibrometry/megeon/
Метрологическая аттестация стандартных образцов предприятия СОП https://analyztepla.ru/katalog-izmeritelnykh-priborov/gazoanalizatory/sensory-dlya-gazoanalizatorov/sensory-khlorovodoroda-hcl/sensor-khlorvodoroda-hcl-b1
С информацией об аккредитации и областью аккредитации по поверке и калибровке можно ознакомиться в разделе Аттестаты и сертификаты https://analyztepla.ru/katalog-lektroinstrumenta-i-prochego-oborudovaniya/ruletki/ada/ruletka-geodezicheskaya-ada-metal-nylon-30
Аккредитованные организации осуществляют поверку и калибровку в строгом соответствии с утвержденной областью аккредитации https://analyztepla.ru/katalog-izmeritelnykh-priborov/gazoanalizatory/kimo/datchik-kontcentratcii-co2-co112
Также для проверки актуальности информации об аккредитации и для подтверждения того, что аккредитованная организация имеет право осуществлять поверку и калибровку, можно воспользоваться он-лайн сервисом Росаккредитации Реестр аккредитованных лиц, где с помощью многофакторного поиска (пример заполнения поисковых строк при проверке аккредитованной организации можно проверить соответствующую информацию и уточнить область аккредитации центра https://analyztepla.ru/katalog-izmeritelnykh-priborov/gazoanalizatory/sensory-dlya-gazoanalizatorov/sensory-ugarnogo-gaza-so/sensor-ugarnogo-gaza-rs4-co-1000-rosen
Если название организации, в которую Вы обратились, не соответствует юридическому названию аккредитованного лица (которое осуществляет поверку), скорее всего это «посредник» и его стоимость услуг может отличаться от стоимости услуг поверяющей организации, рекомендуется тщательно подбирать компанию, где сделать поверку https://analyztepla.ru/katalog-izmeritelnykh-priborov/gazoanalizatory/sensory-dlya-gazoanalizatorov/sensory-dioksida-azota-no2/sensor-dioksida-azota-nt-no2-pl30-net
Лучше обращаться напрямую в аккредитованный центр поверки, это может позволить сэкономить и обезопасит от недобросовестных контрагентов https://analyztepla.ru/katalog-geodezicheskogo-i-navigatcionnogo-oborudovaniya/niveliry-opticheskie/rgk/komplekt-opticheskij-nivelir-rgk-n-38-shtativ-s6-n-rejka-rgk-ts-7
В наличии: Под заказ http://analyztepla.ru/katalog-izmeritelnykh-priborov/teplovizory/megeon/teplovizor-megeon-27711
Калибровка же проводится по методике, обеспечивающей выполнение задач, поставленных перед калибровщиком заказчиком https://analyztepla.ru/katalog-izmeritelnykh-priborov/gazoanalizatory/lider-01-02-04-lidergazdetektor/gazoanalizatory-portativnye-lider-041/gazoanalizator-portativnyy-lider-041-o2-ch4-co2-h2s-7
Так, перед исполнителем могут быть поставлены задачи – определение действительных метрологических характеристик, проверка на метрологическую годность (может ли СИ далее использоваться по назначению), определение метрологической надежности СИ и иные исследования https://analyztepla.ru/katalog-izmeritelnykh-priborov/gazoanalizatory/lider-01-02-04-lidergazdetektor/gazoanalizatoryi-portativnyie-lider-04/gazoanalizator-portativnyij-lider-04-ex-o2-co
I found https://swap-monero.github.io/ after browsing a discussion about XMR, and the information was clear for a first look.
Технология разведения активного вещества: с помощью высокоточных методов и под контролем инфракрасной и ультрафиолетовой спектрометрии;
размножения пробиотиков, тем самым стимулируют рост здоровой микробиоты
Колибактерин - содержит бактерии антагонистически активного штамма E https://пик-крым.рф/product/origanum-vulgare/
coli М-17 https://пик-крым.рф/product/zincum-cyanatum/
Препарат назначают при выраженном дефиците E https://пик-крым.рф/product/eugenia-jambosa/
coli https://пик-крым.рф/product-category/mono/v/
Колибактерин нормализует физиологическое равновесие кишечной микрофлоры, воздействуя на многие патогенные и условно- патогенные микроорганизмы https://пик-крым.рф/product/caesalpinia-bonducella/
Существует три группы корригирующих микрофлору препаратов - пробиотики, пребиотики и синбиотики https://пик-крым.рф/product/thryallis-glauca-galphimia-glauca/
Хитозан;
кишечника https://пик-крым.рф/product-category/mono/page/118/
Молочнокислый стрептококк (Str https://пик-крым.рф/product/caladium-seguinum/
thermophylus);
4 https://adentalab.ru/
Финальная обработка и установка протеза https://adentalab.ru/
Когда восковая модель удовлетворяет требованиям, начинается изготовление окончательной версии протеза из выбранного материала https://adentalab.ru/
После окончательной полировки протез готов к установке https://adentalab.ru/
Врач-стоматолог устанавливает съёмный зубной протез в полость рта пациента, давая рекомендации по уходу и корректировке https://adentalab.ru/
Выбор протезов и материалов, из которых они будут изготавливаться, осуществляет врач, сочетая своё решение с мнением пациента https://adentalab.ru/
Для изготовления зубных протезов используют различные материалы, например:
2 https://adentalab.ru/
Изготовление гипсовой модели https://adentalab.ru/
На основе слепков изготавливаются гипсовые модели, на которых техник начинает работать над будущей конструкцией протеза https://adentalab.ru/
Изготовление зубных протезов — это процесс создания ортопедических конструкций, замещающих утраченные зубы https://adentalab.ru/
Для подбора и изготовления протезов необходимо обратиться к стоматологу-ортопеду https://adentalab.ru/
Протезы изготавливаются специалистом по зубному протезированию (зубным техником) в соответствии с инструкциями стоматолога и результатами сканирования https://adentalab.ru/
• От 100 000 рублей — покрывной условно-съёмный протез на имплантах https://adentalab.ru/
Leave a Comment