
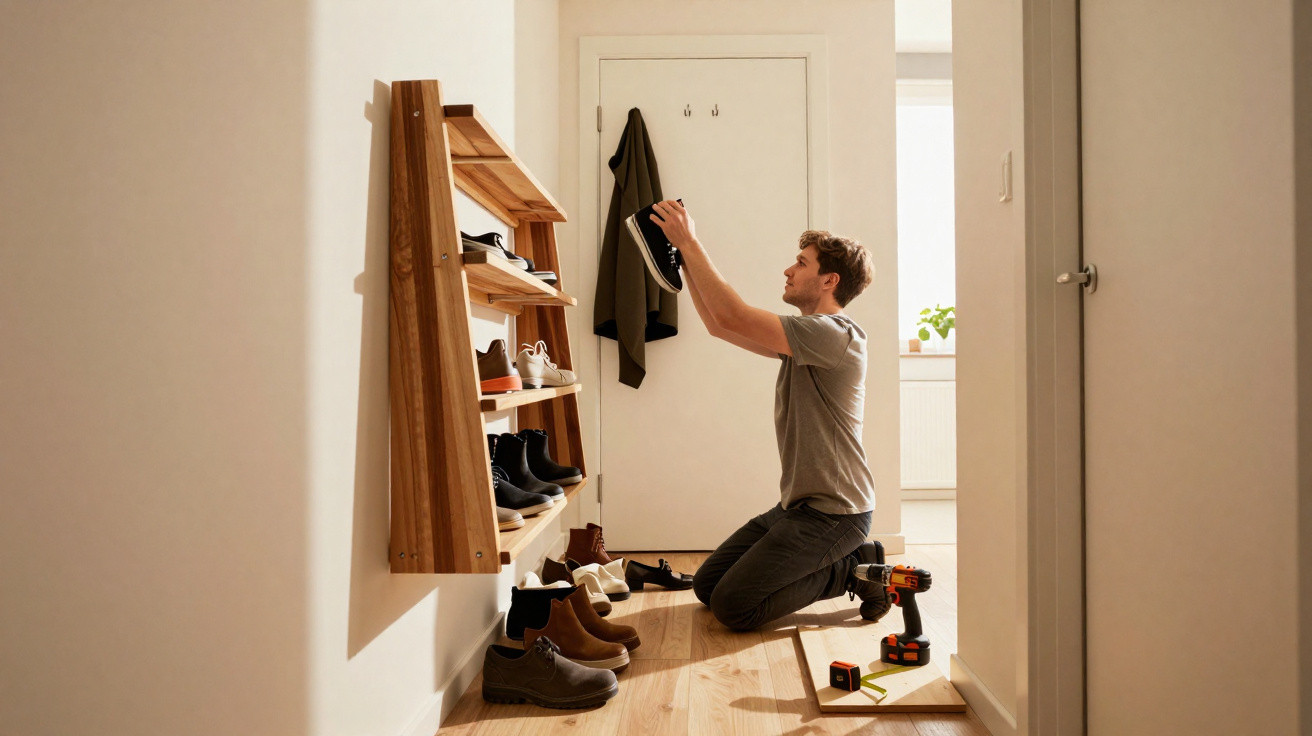
Coming home with shopping, a bag or a child in your arms, then catching your foot on a trainer left behind the door may seem like a silly accident, but it can soon hurt. In a narrow hallway, just a few pairs of shoes can make the space feel cramped and turn every trip through it into an obstacle course.
The good news is that you do not need to buy an expensive, flimsy unit to clear the floor. Offcuts of timber, an old dismantled shelf, battens or a few pieces of pallet wood can become sturdy, unobtrusive storage tailored to your routine. With a little planning, you can build a unit for your most frequently worn pairs without giving up those valuable centimetres in the hallway.
Why shoes on the floor quickly become hazardous
In an entrance hall less than one metre wide, one pair placed at an angle immediately narrows the walkway. The danger is greater in the evening, when the light is fading and your attention is on your phone, keys or whatever you are carrying. Damp soles, untied laces and stiff ankle boots make matters worse, particularly for children and older people.
This visual clutter can also make the whole home appear short of storage, even if every other room is spotless. Once shoes are off the floor, vacuuming becomes much easier. Vertical storage creates an almost instant sense of roominess, making your arrival home more pleasant rather than a source of irritation.
Choosing timber offcuts that will hold up
Before reaching for the drill driver, sort through the timber available in your garage, cellar or workshop. Select boards that are dry, straight and free from deep cracks, as a shoe shelf carries a consistent load. Shelves from an old bookcase, structural battens and thick plywood offcuts are often excellent choices.
Avoid pallets that are marked, damp, mouldy or treated with unknown substances. Reclaimed timber may add character, but it must not have dangerous splinters or concealed rusty nails. Take out old screws, sand any rough sections and make sure each piece sits flat before you start building.
To get the project ready without unnecessary spending, gather the following items:
- 2 upright supports sturdy enough to make the sides of the unit
- 3 to 5 boards or slats to form the storage levels
- wood screws suited to the thickness of your offcuts
- a saw, tape measure, pencil, drill driver and spirit level
- sandpaper to remove sharp edges
- suitable wall plugs if you are securing the unit to the wall
Build an angled shoe storage unit to save space
The easiest design looks like a wide, small ladder set against the wall, or securely screwed to it. Cut two uprights to the same length, then attach several angled crosspieces between them at roughly 20 degrees. This slope holds shoes more securely, reduces slipping and lets you see every pair at a glance.
You can fit three slats at each level to create a shelf that is light yet durable. Leave a small gap between the slats so dust, sand and moisture fall to the floor rather than becoming trapped beneath the soles. Allow around 18 to 22 cm of depth for adult trainers, increasing this if you need to store walking shoes or large boots.
Start by positioning the lowest shelf a few centimetres above the floor. This protects the timber when you mop and stops wet soles from staying in contact with the unit. For a family of four, four tiers can hold between 10 and 16 pairs, depending on the width selected.
Fit wall-mounted shoe storage in an overly narrow hallway
If there is no room for a floor-standing unit in your entrance hall, a wall-mounted option can make a real difference. Secure two rows of small horizontal battens to a sound wall, then slot thick boards between these supports to make removable shelves. This lets you alter the height without dismantling everything when winter boots replace sandals.
Mark every line with a spirit level before drilling, since a shelf that is even slightly slanted can cause shoes to fall or make the storage look untidy. Always fix into studs, brickwork or wall plugs rated for the expected load. If the wall appears weak, place fewer pairs on each shelf and choose shorter boards.
A wall shelf installed 15 cm above the floor allows air to circulate and makes the entrance easier to clean. It can also free up space for a pushchair, shopping basket or small bench. You no longer face the frustrating situation in which everyone has to press against the wall to get through the door without stepping on a shoe.
Add straightforward finishing touches for practical storage
Careful sanding makes a major difference, especially when you use pallet timber or building-site offcuts. Slightly round off the corners close to the walkway to prevent painful knocks to your ankles. Leave the wood unfinished for a workshop look, or apply a suitable oil if the entrance is frequently exposed to moisture.
To stop pairs getting mixed up, give every member of the household their own area. Children’s shoes can go on the lowest level, while ankle boots and heavier styles should stay on a strong low shelf. Put a small tray beneath the unit for muddy soles: the entrance will remain cleaner and you will spend less time picking up clutter.
This homemade storage does not aim for the perfection of a shop-bought unit. It solves a practical problem: coming home without tripping, sighing at the mess or spending a fortune. A few forgotten timber offcuts can therefore create an entrance that is safer, calmer and surprisingly welcoming.


Comments
No comments yet. Be the first to comment!
Leave a Comment