
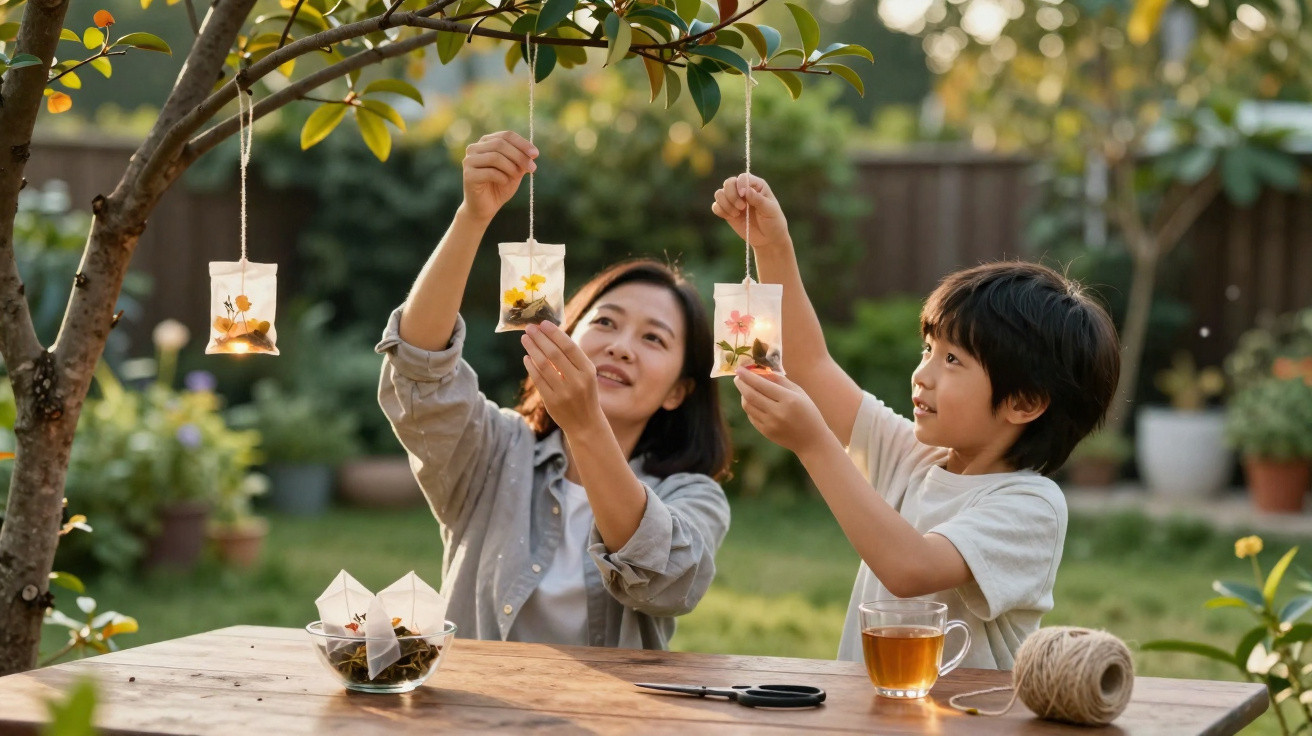
Tea bags usually go straight into the bin after brewing. That is a shame, as their gently translucent paper, amber tint and practical size make them ideal for atmospheric garden lights. A DIY idea from the UK shows how used tea bags can be turned into enchanting lanterns with very little effort – and without costly solar fairy lights.
Why used tea bags give off such a lovely glow
Anyone who drinks plenty of tea already has this craft material in abundance: used paper tea bags. Once the contents have been removed and the bag has dried, it leaves behind delicate paper with a faint brown colouring. That is precisely what makes this upcycling trick so appealing.
“The paper of a dried tea bag acts like a natural filter: it softens harsh light and creates a gentle, golden glow.”
There is another advantage: it costs nothing extra. While designer lanterns and solar garlands can soon become expensive, these lights are made almost entirely from items already found around the home. This saves money while cutting waste – a double benefit that appeals to many people.
Thousands of people now share photographs of their handmade lights on social media. In many kitchens, a jar beside the kettle is used to collect rinsed, dried bags. The tea break therefore becomes a way of building up supplies for the next craft session.
Step by step: making lanterns from tea bags
For a small rectangular lantern, you will need at least eight used tea bags. The more bags you collect, the larger your light feature can be. It is important that the outer bags are made from paper rather than plastic mesh.
Materials to have ready
- used paper tea bags, thoroughly rinsed and dried
- white craft glue, diluted with a little water
- pressed flowers or leaves, flat paper cuttings or confetti
- thin wooden sticks, bamboo skewers or lolly sticks
- LED tealights or battery-powered fairy lights
- optional: a hot glue gun for stronger joins
Preparing the tea bags: the most important stage
To turn the bags into sturdy “windows”, they need a little preparation:
- Carefully cut open one side of each bag immediately after brewing.
- Remove the tea leaves and rinse the bag briefly with water.
- Fully unfold the paper and place it flat on kitchen roll.
- Leave it to dry thoroughly, preferably overnight, so that no moisture remains.
Once completely dry, the papers will look lightly marbled in shades of brown and beige. This texture later produces a lively glow that is very different from plain, clinical white paper.
Turning flat tea bags into a glowing mini tower
Creating the decoration – flowers, leaves and silhouettes
Now comes the creative stage. The individual tea bags become translucent picture panels:
- Use a brush to apply a thin layer of diluted glue to the tea bag paper.
- Arrange pressed flowers, fern fronds, grass or paper cuttings on top.
- Brush over everything with another thin layer of glue to secure the decoration.
- Leave it to dry completely again, until the paper feels slightly firm and stable.
Each panel will later form one side of the lantern. For a more minimalist look, leave some bags plain and skip the decoration altogether – this also creates a beautiful, calm lighting effect.
Building the frame and assembling the lantern
The paper panels need a frame to allow the lantern to stand securely. Wooden sticks work particularly well for this:
- Cut the wooden sticks to match the edge length of the tea bags.
- Glue four sticks together to form a rectangle for each frame.
- Glue a tea bag to the back of the frame, or sandwich it between two frames.
- Make four such sections to create the sides of the lantern.
- Join the sides into a rectangular tower using hot glue or strong craft glue.
“Important: Never put an open flame inside a lantern made with paper. Use LED tealights or battery-powered light sources only.”
Finally, place an LED tealight inside or thread a small string of fairy lights through the tower. The amber glow of the LEDs enhances the natural colouring of the tea bag paper.
Where homemade tea lights make the biggest impact in the garden
The finished lanterns are delicate because they are mainly made from paper. Even so, they can work well outdoors if used with a little care.
Suitable places outside
- on the garden table as a central mood light
- on window ledges or low walls
- on steps and stairways to gently mark a path
- hanging beneath a pergola or on a balcony, well protected from rain
If you use the lanterns outdoors, bring them back inside after the gathering. Moisture, wind and dew would otherwise quickly make the paper warped or brittle. Stored somewhere dry, the lights will last much longer and can be used over several summer evenings.
A family project instead of a throwaway habit
In some homes, the idea has already become a regular ritual: whenever tea is brewed, the used bags no longer go straight into the rubbish but into a collecting jar. Children can gather and press flowers, then help with the decoration later. Adults can take care of the glue, frame construction and lighting.
This turns a simple hot drink into a small creative cycle: drink tea, save the bags, make lights. It is an easy craft activity for rainy afternoons or school holidays, with a visible result ready to enjoy in the evening.
What to consider for safety and durability
Paper and light require a few basic precautions. Follow them, and you can enjoy the lanterns for a long time.
- Use LEDs only: Do not use real candles, taper candles or incense sticks nearby.
- Store them dry: Keep the lanterns indoors after use and away from damp conditions.
- Make sturdy frames: Choose slightly thicker wooden strips so the tower does not topple over in every draught.
- Keep an eye on the power source: Replace batteries in good time to prevent leakage.
If you want to use the lanterns in the garden more often, you can lightly seal the wooden frames with water-based clear varnish. This helps protect the wood from humidity without noticeably altering its appearance. Leave the tea bag paper untreated so that it remains attractively translucent.
Variations for balconies, patios and indoors
The basic idea is easy to adapt. Long, narrow lanterns are ideal for balconies because they require little surface space. In the living room, small light boxes look effective on a windowsill, perhaps with wintry paper motifs when dusk falls early outside.
You can also combine different tea varieties: black tea, green tea and rooibos each colour the paper slightly differently. It is also worth experimenting with formats: two rows of stacked tea bags make a taller column, while smaller tea bags create a delicate table light.
At its heart, this idea demonstrates how much potential everyday leftovers can hold. Something normally treated as waste can become, with just a few simple steps, an object that creates atmosphere and becomes a talking point at the next garden party. Anyone who loves tea will almost always have the material close to hand.


Comments
No comments yet. Be the first to comment!
Leave a Comment