
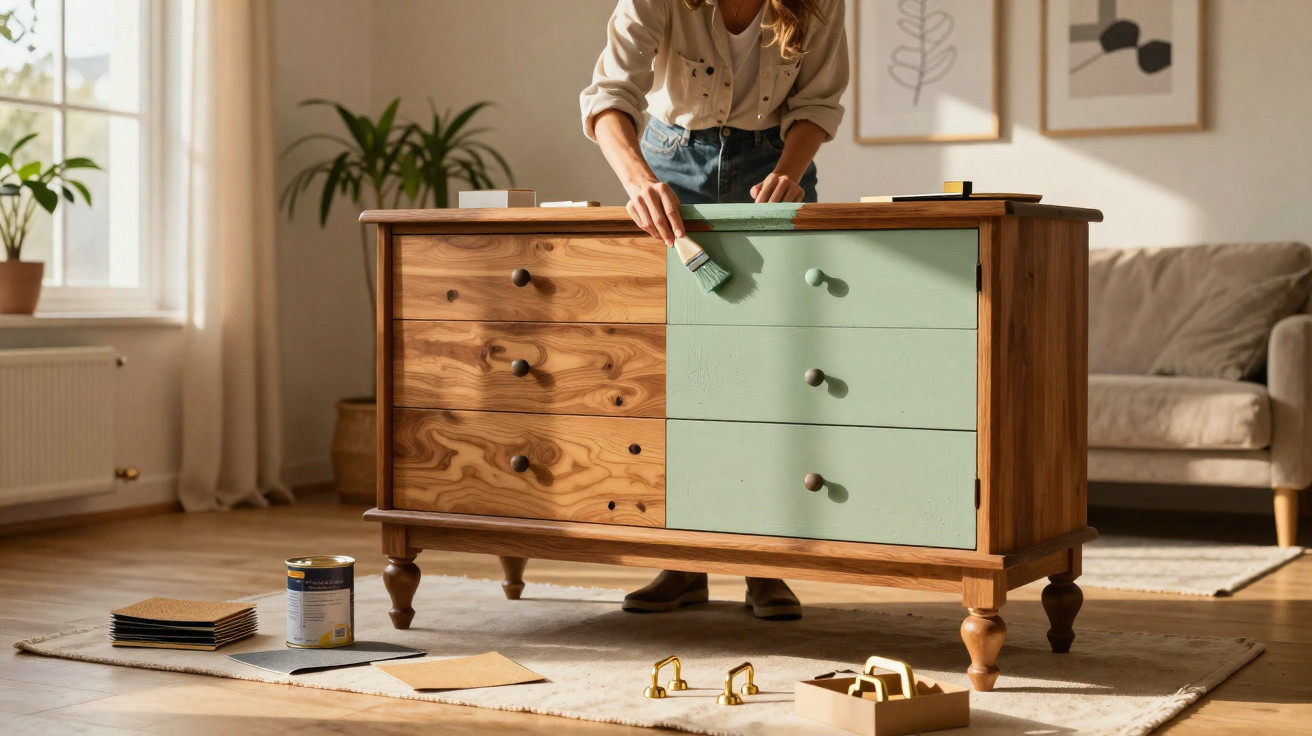
The answer is closer than you might think.
Rather than reluctantly taking a bulky wardrobe to the tip, more and more people are reaching for sandpaper, paint and replacement handles. With a few well-planned steps, an old-fashioned piece can become a contemporary focal point that visually suits a loft, a new-build flat or a renovated period home – without a large budget or turning the living room into a building site.
Why you should not throw away an old family piece of furniture
Many households know the situation: a large, dark solid-wood sideboard, grandparents’ carved wardrobe unit, or a heavy chest of drawers that overwhelms the bedroom visually. You may feel attached to it emotionally, yet find it unattractive. This is exactly where the trend of deliberately updating old furniture rather than buying new begins.
“Updating an old solid-wood piece of furniture saves money, conserves resources and preserves a piece of family history.”
Compared with buying new, the costs remain clearly manageable. Many projects can be completed on a budget of between €30 and €100, depending on the furniture’s size and condition. This will generally cover:
- a quality primer to help the paint adhere better;
- water-based furniture paint or coloured paint;
- sandpaper and masking tape;
- a small selection of brushes and rollers;
- new handles or knobs.
There is also a value that cannot be measured in euros: many of these pieces are made from solid wood that has already proved its durability. Throwing them away means disposing of both the material and the craftsmanship. A clever redesign keeps the furniture useful in everyday life while stopping it from looking like an out-of-place relic from another decade.
When properly restored and finished with a suitable sealant or wax, the new surface will generally last for years. Five to ten years without much additional effort is realistic. The piece becomes a one-off that blends naturally into your existing interior.
The step-by-step method for a modern look
Preparation is the crucial stage. Anyone who cuts corners here may later be frustrated by flaking paint, stains or visible brush marks. Professionals therefore work through clearly defined stages.
1. Clean and degrease thoroughly
Before even a drop of paint is used, the wardrobe, chest of drawers or sideboard must be completely clean. Old polish, greasy hand marks, dust in mouldings and grooves – all of these prevent fresh paint from adhering properly.
- Wipe down surfaces with a mild cleaner and warm water.
- Treat greasy areas specifically with a degreaser or methylated spirits.
- Allow fronts, edges and corners to dry thoroughly.
It is then worth preparing the room as well: cover the floor with protective sheeting or cardboard, protect mouldings with masking tape and, where possible, remove doors and drawers or at least leave them open.
2. Remove handles and apply primer
Old knobs, metal handles and key escutcheons should be removed first. Many will be replaced later, while some can be reused after spraying them with paint. Now comes the most important technical stage: priming.
“A suitable primer often saves hours of sanding and delivers an even, durable finish.”
The primer needs to suit the material – painted or veneered furniture will often require a specialist adhesion primer. Apply it evenly using a roller or brush. Be sure to allow adequate drying time afterwards, otherwise the next coat of paint will smudge.
3. Apply thin coats instead of thick paint
Many DIY enthusiasts make a mistake at this point: to finish more quickly, they apply too much paint in one go. This creates drips, uneven surfaces and longer drying times. Professionals use several thin coats of water-based furniture paint.
- Use a foam roller on larger areas.
- Paint edges, mouldings and carvings with a narrow brush.
- Let each coat dry properly before applying the next.
- Smooth out small runs immediately with a cloth and a little solvent.
Two to three coats are usually enough for a complete transformation. Light shades are especially popular: off-whites, warm cream tones or soft greige. They visually reduce the heaviness of the furniture and make dark, imposing pieces appear lighter.
A practical workshop tip: leave doors slightly open while painting. This prevents them from sticking to the frame as they dry and ensures the edges are covered neatly.
Turn it into a focal point with handles, details and care
Once the paint has dried completely, it is time for the stage that turns a piece from “quite nicely done” into a real statement item: choosing the handles and deciding on the surface finish.
New fittings, major impact
Gold, matt black or leather-covered handles can instantly alter the character of a piece of furniture. Even old metal handles can be transformed into a modern feature with matt spray paint in a brass finish or black.
“Often, just a few new handles can turn a heavy inherited wardrobe into what looks like a new designer piece.”
Typical combinations that work well include:
- Light, cream-coloured furniture with understated matt-gold handles.
- A grey or greige finish with black bar handles.
- A naturally finished wood surface with leather pull handles.
After fitting the handles, you can give the furniture additional protection. A clear varnish or colourless wax protects light surfaces against stains and wear.
Everyday care and durability
To keep the new look enjoyable for a long time, the furniture needs only limited but targeted care. Use mild cleaners, avoid harsh chemicals and do not use abrasive sponges. When moving vases or decorative items, it is worth placing something underneath them to prevent scratches.
| Measure | Benefit |
|---|---|
| Reapply wax annually or touch up small areas of varnish | Prevents early wear and fading |
| Use felt pads beneath decorative items | Protects the surface from scratches |
| Remove dust regularly with a soft cloth | Maintains shine and colour impact |
Which furniture is especially suitable – and where pitfalls lie
In principle, almost any stable piece of furniture can be redesigned. However, some candidates are particularly suitable and create spectacular before-and-after results.
- Large wardrobes with carved doors
- Solid living-room sideboards made from dark oak
- Chests of drawers in bedrooms or hallways
- Old kitchen dressers or display cabinets
Veneered furniture deserves a closer inspection: if the veneer is already peeling, loose areas must first be glued down or removed completely. Heavily damaged surfaces also require more preparation. Cracks, deep scratches and woodworm holes should be filled and treated before painting.
There is another consideration: not every type of wood is compatible with every varnish. If in doubt, carry out a small test in an inconspicuous spot before painting the entire wardrobe.
Getting more from the project: colours, styles and combinations
Those feeling bolder can use paint to deliberately recreate particular styles: an old sideboard with a dark carcass and light fronts can suddenly look Scandinavian. Soft sage green combined with brass handles evokes country-style kitchens. Deep midnight blue with gold knobs brings a hint of boutique hotel style to the bedroom.
A partial makeover is another option. Paint the lower section while leaving the upper section in its wood tone, add colour only to the fronts while keeping the frame natural – mixed approaches like these visually lighten bulky furniture without changing it completely.
Anyone with a little practical experience can combine painting with small alterations: have doors replaced with glass, add shelves, or line interiors with wallpaper. This turns a purely storage-focused item into a display piece for books, ceramics or glassware.
The result is more than simply a refreshed heirloom: you create a personal design object that cannot be found in precisely the same form in any furniture shop. Every time you walk past it, the outcome reminds you that “too old” can quickly become “just right” with the right idea and a few purposeful changes.



Comments
No comments yet. Be the first to comment!
Leave a Comment