
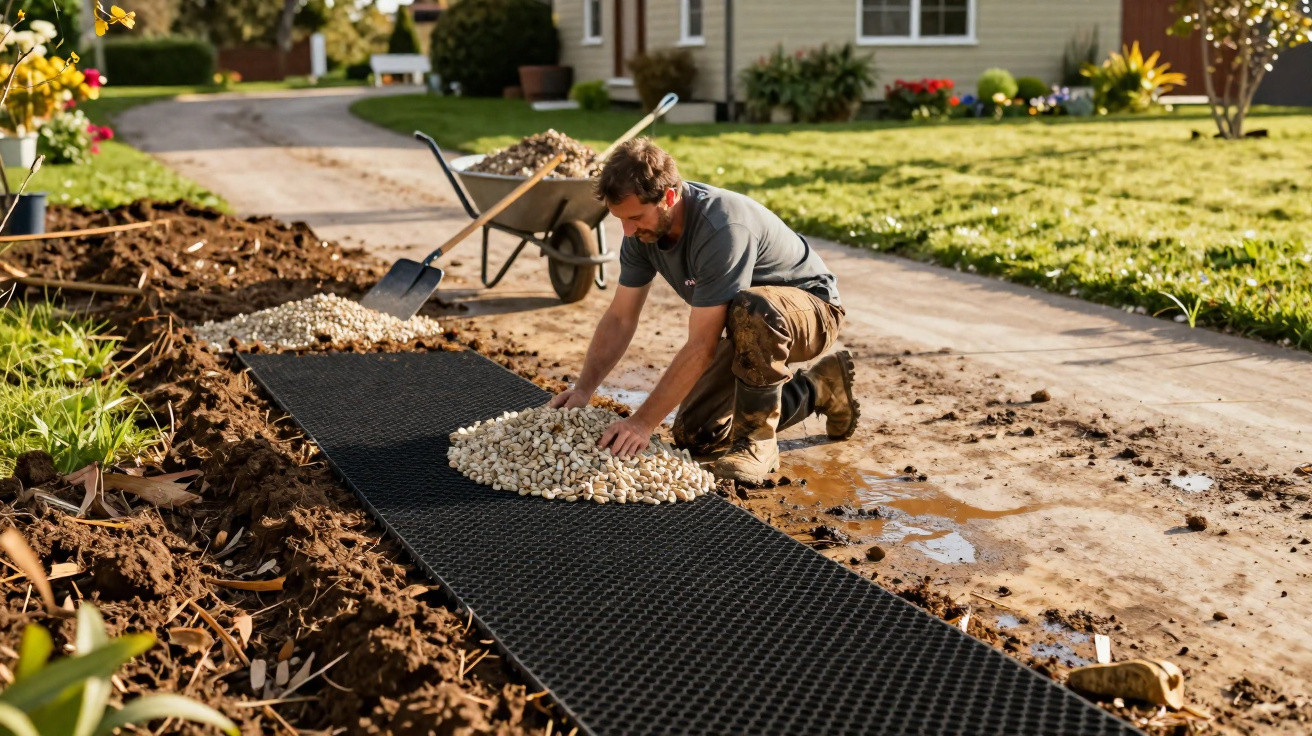
By the time he reached the gate, boots sank into the ground with that thick, sucking sound familiar to people living in the countryside: waterlogged soil, leaves and small stones swallowed by mud. One Saturday morning, following another downpour, Marc looked wearily at his 18-metre driveway. The car was slipping, the children came indoors with soaked socks, and every visitor began with an apology from the doorstep. He had considered concrete, then hiring a contractor, but abandoned both ideas because of the cost and timescale. A few hours later, the route looked entirely different. It was dry underfoot, firm beneath the wheels and remarkably natural-looking. The most surprising part was still to come.
A muddy driveway made stable without pouring a concrete slab
The turning point came from a straightforward observation: the mud was not taking over because the ground was “bad”, but because water was trapped beneath the compacted topsoil. Repeated traffic had formed two deep tracks, where rainwater collected like it would in small gutters. Rather than covering the issue with a layer of cement, Marc chose to give the ground a structure that would allow water to drain downwards while spreading the car’s weight. The ground needed to breathe again.
His driveway was roughly 18 metres long and 2.80 metres wide, covering just over 50 m². With a neighbour’s help and a wheelbarrow, he removed around 10 centimetres of soft mud, then laid geotextile fabric and recycled plastic gravel grids. He filled the cells with crushed gravel in a 6/10 grading. Within six hours, including coffee breaks, the access route no longer resembled the brown corridor he had avoided for weeks.
The method relies on an almost ordinary principle: a free-draining material reduces puddles, while a cellular structure distributes the load from vehicle wheels. The gravel remains in place rather than sinking into the soil, and the grids stop ruts from returning after the first rainfall. There is no magic involved; it is mainly about laying the layers properly. The finished surface retains a flexible, natural feel, far removed from the cold appearance of a completely mineral courtyard.
The method that prevents the most expensive mistakes
Before ordering anything, Marc waited for a rainy day to watch how water moved across the driveway. It is a very practical step, and often more useful than lengthy calculations: identify where water arrives, where it pools, then check whether a gentle slope can direct it away from the house. He created a subtle gradient of around 1 to 2% towards a planted area. For a driveway used only by light cars, excavating between 10 and 15 centimetres is often enough, depending on the ground conditions.
The most common mistake is tipping gravel directly onto mud in the hope that it will “dry out” the route. We all know that urge to solve a garden problem in one afternoon with three bags bought in haste. Yet the gravel sinks, mixes with the soil and gradually disappears. Let us be honest: nobody wants to keep doing that. Geotextile fabric, laid taut without major folds and turned up slightly at the edges, costs little compared with the time it saves.
Selecting the infill matters as much as the installation: crushed gravel locks together more effectively than overly rounded gravel, which is often unstable beneath shoes and tyres. Marc also recommends allowing for a few extra bags, as the cells take more material than they appear to at first glance.
“I only wanted to stop walking through mud. In the end, what I really understood was that a driveway does not need to be as hard as concrete to be strong.”
- Excavate the wet soil and remove any visible roots.
- Level the base while maintaining a gentle slope away from walls.
- Roll out robust geotextile fabric before laying the gravel grids.
- Fill the cells with crushed gravel, then compact it in successive passes.
- Give the material a few days to settle naturally into place.
A sensible choice for the budget and the garden
The final price depends on the excavation work, the region and the grid type, but Marc estimates that he spent between €18 and €30 per m², including gravel. This remains well below the cost of a professionally laid concrete slab, particularly where wet ground needs preparing first. The saving is not limited to materials: there is no concrete mixer lorry to bring in, no concrete to wait for and no project blocking access for several days. Simplicity can sometimes be a real advantage.
This option is not suitable for every use. A heavily used driveway, regular motorhome traffic or loaded vans require a thicker base, with a compacted crushed-stone layer beneath the grids. On highly unstable clay soil, it is also important to take the time to drain water at its source rather than disguising the symptom. Marc readily acknowledges that his driveway is for a family car, not a tractor. That distinction changes everything.
There is another, less obvious but rather welcome benefit: rainwater can still soak into the ground instead of flowing into the drainage network or running across an impermeable surface. Between the gravel, a few windblown seeds have even started to green the edges. It is not an English garden, nor was that ever the aim. However, the driveway blends into the plot better than a large grey slab placed in front of the house.
This sort of transformation tells a very familiar story: when faced with an irritating problem, we often assume the answer must be substantial, costly and permanent. Then a more modest solution emerges, provided we pay attention to what is happening beneath our feet. Marc’s driveway will probably never feature in an architecture magazine, but it has made bringing home the shopping less frustrating and rainy mornings a little easier. Anyone who has carried bags of groceries over a puddle will understand immediately. Between concrete and mud, there can sometimes be a third option: more flexible, more accessible and unexpectedly durable.
| Key point | Detail | Benefit for the reader |
|---|---|---|
| Prepare the ground | Excavate the area and create a gentle drainage slope | Reduces puddles and prevents mud from returning quickly |
| Lay geotextile fabric | Separate the soil from the gravel using suitable membrane | Prevents materials from mixing and sinking |
| Choose gravel grids | Fill the structure with crushed gravel | Creates a stable surface without concrete or construction machinery |





Comments
No comments yet. Be the first to comment!
Leave a Comment