
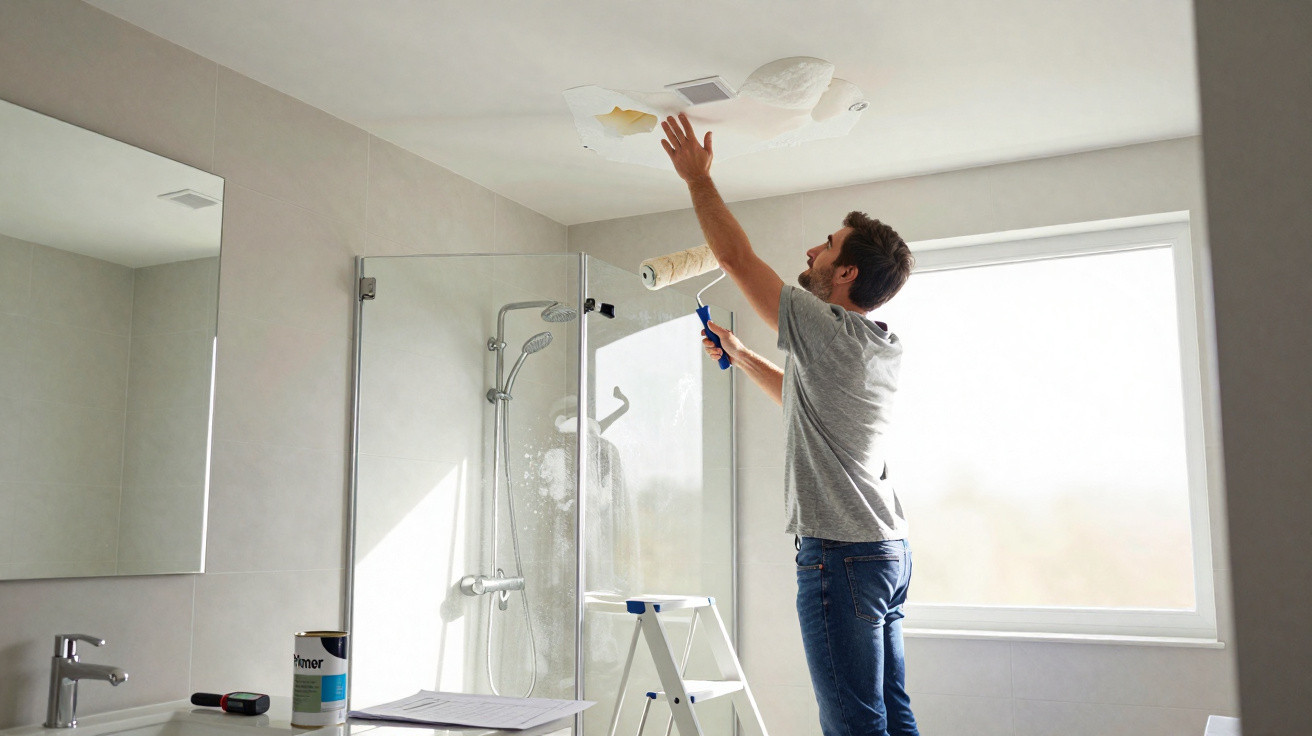
When the urge for a fresher home arrives in spring, many people quickly reach for a paint roller. A new coat of paint can make a bathroom look brighter and more contemporary almost immediately. Yet plenty of DIY decorators discover a year later that they have fallen into a costly trap: choosing the wrong wall paint for a humid room can literally cause it to come away, leaving bubbles, flaking and crumbling patches behind.
From post-painting pride to a bathroom nightmare
The first few months: everything looks flawless
Immediately after painting, there is usually no sign of trouble. The finish appears smooth, the coverage looks good, light is reflected more effectively and the room feels larger. In a bathroom, this before-and-after transformation can be particularly dramatic.
Many amateur decorators opt for budget buckets from a DIY retailer, often using standard emulsion paint intended for dry living spaces. Initially, that does not seem to cause any issues. The paint remains in place, showers and baths are used as normal, and nobody suspects a problem.
“The real damage develops out of sight – deep within the paint layer, long before the first bubbles become visible.”
It is only after several months that the consequences begin to show. Certain areas may look slightly rippled, while tiny raised spots start to emerge. Anyone who overlooks these early warnings may face an unpleasant surprise later.
After 6 to 18 months: bubbles, bulges and flaking
The most critical period is generally between half a year and a year and a half of ordinary use. At that point, clearly visible defects can suddenly appear:
- raised bubbles on the ceiling
- bulges and small hollow areas directly opposite the shower
- flakes of paint breaking away and falling to the floor
- patchy, dull sections on walls and ceilings
Two areas are especially vulnerable: the bathroom ceiling and wall surfaces exposed directly to shower spray and steam. In these zones, humidity regularly reaches 80 per cent or more – far beyond what ordinary wall paint can withstand over time.
Why bathroom paint actually peels away
Moisture works its way beneath the paint layer
This problem is not caused by “poor painting” or “using the wrong roller technique”. What matters is the combination of humidity, warmth and unsuitable paint.
Every shower produces dense steam that spreads through the entire room. The humid air persistently finds its way into the smallest pores. Once it gets behind the painted surface, the damaging process begins:
- Steam condenses on cold surfaces, such as ceilings and external walls.
- Moisture seeps into fine hairline cracks and unprotected areas.
- The paint layer absorbs moisture from behind, swells and loses adhesion.
- Bubbles form and can burst when pressed or exposed to further dampness.
Eventually, larger sheets of paint detach, the substrate is exposed and the whole finish starts to look like a failed temporary fix.
What the NF EN 13300 standard means for your bathroom
Paints for living areas can be divided into different classes. In humid rooms, resistance to water and water vapour is particularly important. This is where the NF EN 13300 standard becomes relevant, as many manufacturers display it on the paint container.
“Only paint expressly approved for humid rooms and offering a high water-resistance class belongs on bathroom walls.”
Anyone focusing only on shade and price in the shop can easily make the familiar mistake of buying ordinary wall paint instead of moisture-resistant or bathroom paint. Safer choices include:
- glycol-resin or solvent-based bathroom paint (often more hard-wearing, though with a stronger odour), or
- special acrylic paint for humid rooms with clear labelling on the container.
The key difference is the formulation: it contains special resins that repel water vapour and prevent moisture from travelling behind the paint layer. This can dramatically extend the lifespan of the finish.
How to protect your bathroom from bubbles and mould for the long term
In a bathroom, primer is almost essential
Simply rolling fresh paint over an old surface is a false economy. Plasterboard, filled walls and old, damaged paintwork in particular need a suitable primer.
A moisture-resistant primer or specialist bonding primer performs several functions:
- it seals the substrate so that it does not absorb moisture like a sponge
- it closes pores and microcracks that could otherwise allow moisture to enter
- it helps the new paint provide even coverage
- it improves adhesion, reducing the risk of the finish peeling again
An additional, particularly moisture-resistant base coat is worthwhile around the shower and on the ceiling. You will not see this work once the job is finished, but its value becomes clear when the paintwork remains stable for years.
Even the best paint has limits without effective ventilation
Paint systems can compensate for a great deal, but not for everything. If each shower turns the room into a dripping cave and there is hardly any ventilation, the indoor climate will eventually become unsuitable. A technical solution can help.
A ventilation system that continuously exchanges sufficient air is advisable. As a guideline, around 30 cubic metres of air per hour should be extracted from a typical bathroom. That may sound technical, but in everyday terms it means steam is removed quickly instead of soaking into the ceiling and walls.
“If the mirror is clear again just minutes after a shower, you are generally on the right track with humidity control.”
A working extractor fan, an adequately sized air inlet and regular rapid ventilation can bring bathroom humidity below the critical threshold of around 65 per cent relative humidity. Below this level, both paint and plaster can last substantially longer.
Two coats, applied crosswise – and patience while drying
Applying the paint itself may seem straightforward, but many people fail over one detail: drying time. Bathroom paint especially needs time for the coating to cure.
A proven practical method is:
- apply the first coat evenly, without overworking the surface
- allow it to dry completely for at least 24 hours, using the bathroom as little as possible
- roll on the second coat at a right angle to the first, using a crosswise pattern
- leave it to dry for another full day before taking a hot shower
This crosswise application makes the surface denser, closes minor imperfections and creates a far more robust barrier against steam and condensation.
What to check before your next bathroom project
Spot potential faults early instead of redoing everything later
If you can already see bubbles, cracks or dull, chalky patches in your bathroom, it is worth investigating more closely. Possible warning signs include:
- paint bubbles that feel soft when pressed
- areas that sound slightly hollow when tapped
- dark shadows or stains despite no visible direct contact with water
- mirrors and windows that mist up frequently, even after a short shower
The sooner you take action, the less surface area you will later need to sand back completely or rebuild. In many cases, it is enough to remove the damaged sections cleanly, fill them, apply primer and repaint with bathroom paint.
Practical planning tips for your next renovation
Anyone renovating a bathroom in spring or summer can avoid significant frustration with a few simple measures:
- At the DIY shop, specifically ask for “bathroom paint” or “moisture-resistant paint” rather than choosing only a favourite shade.
- Check the stated resistance to water and wet scrubbing, rather than looking solely for “high coverage”.
- Inspect the extractor fan: does it work at all, does it run on for long enough, and is the airflow route clear?
- While painting, leave at least one window on the latch or create through-draughts so moisture can leave the room.
- Do not shower in the bathroom between coats, as this can interfere with drying.
Approaching a bathroom project in this way avoids the frustrating experience of standing there again a year later with filler, sandpaper and a paint roller. The combination of suitable paint, thorough preparation and consistent ventilation turns a quick cosmetic update into a renovation that withstands bubbles, cracks and flaking for several years.

Comments
Не тратьте драгоценное время – свяжитесь с нами по телефону, оформим заявку и отправим мастера со всем необходимым оборудованием к вам https://zapchasti-remont.ru/shop/diski_i_muftyi/
Выезжаем во все районы Санкт-Петербурга и Ленобласти
Все специалисты ремонтной службы имеют сертификацию и огромный опыт работы с разными марками и моделями стиральных машин практически всех производителей https://zapchasti-remont.ru/shop/trosyi_gaza/
Greetings! I recently found something worth checking out and figured I'd pass it along. Take a look — [url=https://craftatlas0.io/]useful resource[/url]. Curious what you all think https://craftatlas0.io/
Leave a Comment