
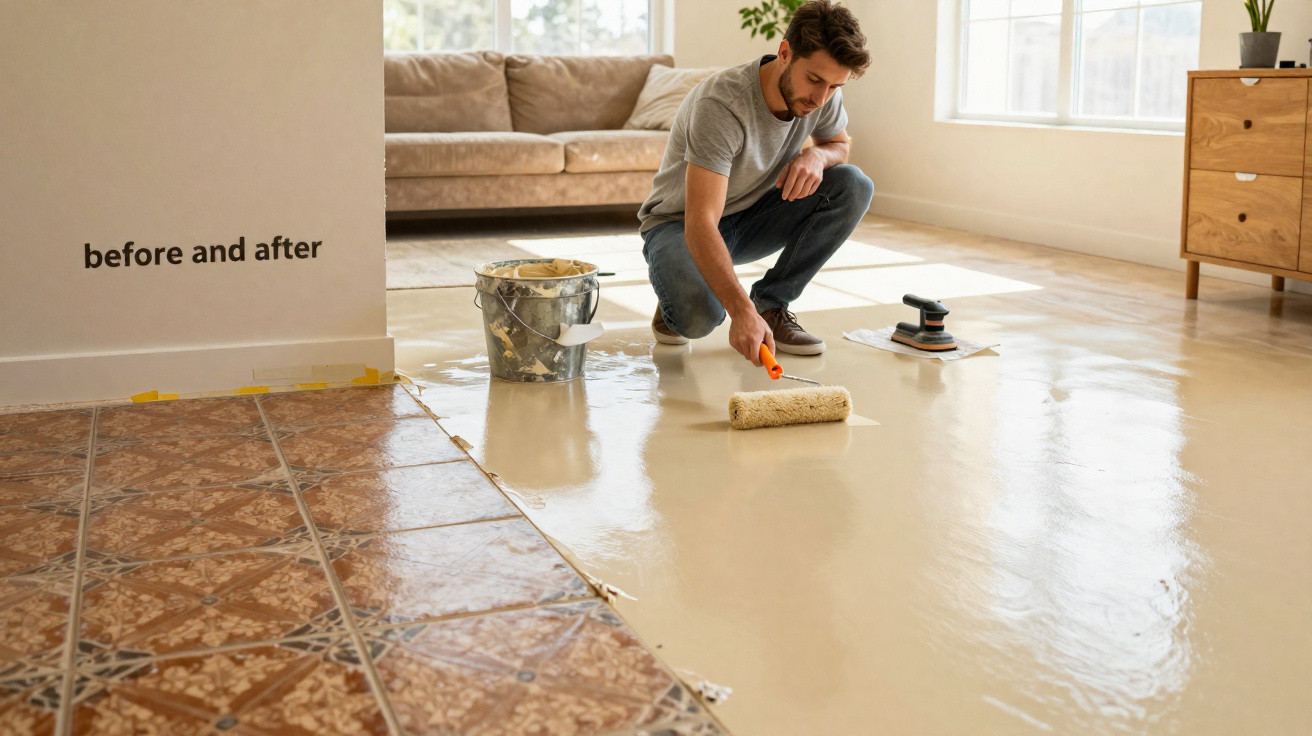
Many flats look dated solely because of their old-fashioned tiled floors – yet these can now be transformed without any demolition work.
Anyone who has ever removed old tiles knows the ordeal: dust, noise, days of building work at home and a budget that keeps rising. However, there is a solution that leaves the existing floor exactly where it is while still giving the room the appearance of a complete makeover.
Why a new floor without demolition makes such a difference
Many homes still have beige, brown or small-format tiles that are technically sound but visually recall the 1990s. A floor like this can make an entire room feel less appealing, regardless of how modern the kitchen, furniture or lighting may be. As a result, many homeowners and tenants delay renovation because they do not want to live with a building site.
Traditionally, fitting a new floor means chiselling up tiles, disposing of large quantities of rubble, repairing the screed and laying a new covering. This takes time, money and patience. Anyone who has only just moved in or has a limited budget will often want a quicker, cleaner alternative.
The smart shortcut: the old tiled floor stays in place but is fully covered – grout lines included.
This is where a specialist floor covering comes in, applied directly over the existing tiles. Its major advantage is that it creates a seamless surface with a uniform appearance, immediately making the room feel calmer and more contemporary. At the same time, all the disruption of demolition is avoided.
Resin flooring instead of tile chaos: how the system works
The solution is called floor resin, generally based on epoxy or polyurethane resin. The material is applied in liquid form and flows across the old tiles to create a continuous layer. The grout lines disappear, the tiles no longer show through, and the floor gains an even finish similar to those found in modern lofts or designer bathrooms.
There is also a surprisingly broad choice of colours: from warm stone shades and cool concrete greys to bright whites. The finish can be matt, satin-matt or glossy. This makes the new floor equally suitable for a family kitchen, a minimalist living room or a stylish bathroom.
Another benefit is that floor resin forms a continuous, water-repellent layer. When correctly applied, the covering is durable, resistant to splashes, and considerably less likely to scratch than many paints or basic coatings.
Advantages of resin flooring over old tiles
- Seamless finish: no dirt collecting in the gaps and easier cleaning
- Water-resistant: ideal for bathrooms, kitchens, guest WCs and utility rooms
- Flexible appearance: matt, satin-matt or glossy, with numerous colour options
- Faster to install than removing all the tiles
- Long-lasting, provided the substrate is properly prepared
When resin flooring over tiles is genuinely suitable
Attractive as the idea may be, not every old tiled floor is automatically suitable. The substrate needs to meet several requirements; otherwise, the quick solution may create problems later on.
The key points are:
- Stability: Tiles must not sound hollow or move underfoot.
- Cleanliness: The floor must be thoroughly cleaned and degreased.
- Dryness: There must be no moisture issues in the substrate.
- Evenness: Grout lines and minor damage need to be levelled beforehand.
Loose tiles are a real risk. If they later come away, the resin layer above them can also lift or crack. If tapping reveals hollow areas, these sections should first be secured or, if in doubt, replaced.
Only a stable, clean and dry substrate provides the basis for a floor that looks good and lasts for years.
Very smooth, glossy tiles usually need a specialist primer. This ensures the resin bonds properly and does not later peel away in flakes.
Step-by-step preparation
The visible stage – pouring the resin – often takes only a few hours. The real work lies in the preparation. Cutting corners at this stage can lead to cracks, bubbles or an uneven finish later.
- Thorough cleaning: Remove dust, grease and any residues from old care products.
- Checking the tiles: Carry out a tap test, then repair or replace any loose tiles.
- Levelling grout lines: Fill recessed areas to create a surface that is as even as possible.
- Applying primer: Use a specialist bonding layer suited to the tile type.
- Pouring the resin layer: Spread it evenly and roll out air bubbles.
This preparation determines whether the finished floor genuinely resembles a high-quality, continuous covering or looks more improvised.
DIY or hire a professional – which is more realistic?
A do-it-yourself project can be an option for smaller rooms with straightforward layouts, such as a guest WC or compact kitchen. Ready-made kits are available from around €18 per square metre. They usually include primer, resin and sometimes a sealing layer as well.
However, the materials alone are not enough; some practice is also required. Resin has a limited working time. Anyone who works too slowly risks visible joins or overlaps. Air bubbles must be removed using a spiked roller, and the layer thickness must also be kept under control.
Anyone confident with a brush and roller and willing to follow the instructions precisely can tackle smaller areas themselves – but larger rooms are usually better handled by a specialist contractor.
For spacious living rooms, complete bathrooms or open-plan kitchen-living areas, many people therefore prefer to call in professionals. Depending on the system and chosen finish, costs generally range from €100 to €150 per square metre. This covers not only the installation itself but also the expertise needed for the correct layer thickness, suitable texture and slip-resistant options.
Which finish suits which room?
Choosing a resin floor also involves several design decisions. The finish should be practical as well as attractive.
| Room | Recommended finish | Special consideration |
|---|---|---|
| Bathroom / shower | matt or satin-matt, slip-resistant | greater safety when wet |
| Kitchen | satin-matt, neutral shades | stain-resistant and easy to clean |
| Living room | satin-matt or lightly glossy | calm, elegant surface effect |
| Hallway / entrance | durable, preferably matt | disguises visible dirt marks more effectively |
Anyone who is unsure can ask to see sample boards or test the colour on a small area, such as inside a cupboard or behind a future piece of furniture.
How should the new floor be cared for properly?
One of the major everyday benefits is that cleaning becomes quicker. With no grout lines, there are no gaps where limescale or grease can build up. A soft mop, lukewarm water and a mild cleaner will usually be entirely sufficient.
Harsh abrasive products, aggressive solvents and very stiff brushes, on the other hand, can damage the floor. Avoiding these products can significantly extend its lifespan. In heavily used areas, applying a fresh seal after a few years may be worthwhile to restore the newly poured appearance.
What to consider before deciding
Floor resin noticeably changes the character of a room. The result is more modern, calmer and often somewhat more “industrial” than traditional parquet or stoneware. Those who prefer a cosy country style could use warmer colours or lightly clouded effects to give the surface more life.
It is also important to consider floor height: the new covering adds a few millimetres. Doors must still be able to open, and transitions to other rooms should not create trip hazards. In many cases this can be resolved without difficulty, but it should be considered at an early stage.
As a broad guide, it is worth reviewing the overall budget. If larger refurbishment work is already planned, such as electrical work or bathroom renovation, resin flooring can form one element of the wider project. For anyone who simply wants to move on from old tiles visually without living on a building site day after day, a seamless covering is often the middle ground between a full renovation and purely cosmetic changes.

Comments
No comments yet. Be the first to comment!
Leave a Comment